
Twitter (X) Scraping
Since Elon Musk bought his way into X (former Twitter) getting information from it, such as tweets and its details, has become increasingly challenging without resorting to its paid API. This shift added to my memories of a time when information access were easier, when we had many ways of mining Twitter inspired me to explore alternative approaches to data mining and since I'm using JavaScript why not use it to do so.
Let's start describing what is our main dependency here: Puppeteer.
Puppeteer is a dependency created in a way that you can navegate using chrome to any website that you want using its URL and the HTML's code of it! In a way that makes it an incredible powerful tool. However there's a major issue to adress before anything.
This dependecy acts as a bot, so yes, it can get you banned from websites that detects those. The solution? Puppeteer itself.
Dependencies in the code with stealth activation:
const puppeteer = require('puppeteer-extra');
const StealthPlugin = require('puppeteer-extra-plugin-stealth');
puppeteer.use(StealthPlugin());
This dependencies Extra and Stealth from puppeteer itself already fix this major issue making your created bot passing as a human.
To test i used this website https://bot.sannysoft.com/. It shows if you're acting as a bot (red color) or as a human (green color). And that's where we can see the diference between using only puppeteer and puppeteer-extra with the steath plugin.
Puppeteer Extra with the Steath plugin:
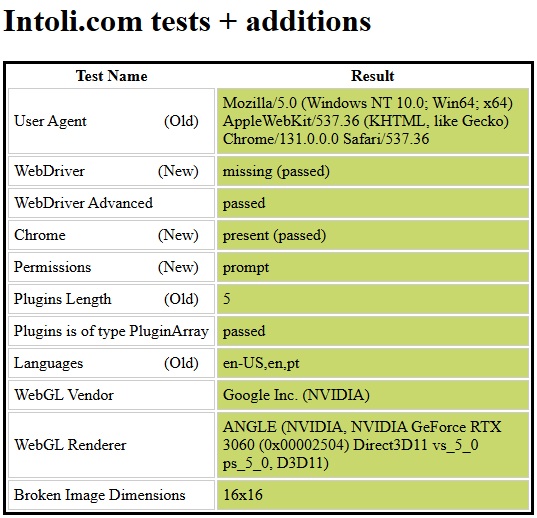
It has other tests that are way to many to put here, but yes, they're all green.
With this issue solved let's dive into the code.
The Code itself
This project is open source and it is at my Github Page for anyone to access.
Puppeteer is quite simple to understand, here's an example of what is the code to go to X's login page:
const url = 'https://x.com/i/flow/login'
const browser = await puppeteer.launch({ headless: true });
let page = await browser.newPage();
await page.goto(url);
await setTimeout(4000);
What's happening here is that we define a page to start, in this case it's X login page, we await for the browser and set a timeout for it to load properly.
Interesting thing is the "headless: true" command. This is where you set if you want to see the browser or not, if you set it to FALSE you'll see the browser and TRUE you won't. I honestly think its counter intuitive since FALSE you WILL see it and TRUE you WON'T but the statement "HEADLESS" is a negative so hahahaha. I don't know why but i think this is quite funny hahaha.
So anyway this is how you access a page. Now let's dive into the logic.
Once we're at the login page how to actually log in? This is how I did it:
await page.waitForSelector(`xpath/.//input[@name='text']`);
const [inputLoginField] = await page.$$(`xpath/.//input[@name='text']`);
await inputLoginField.type(env.USERNAMELOGIN);
await page.keyboard.press('Enter');
await setTimeout(2000);
The command "waitForSelector" will check if the page's html code have this on it, so i wen't to the login page and saw that the input to the email is "name='text'" and i put the code to wait for this block of code appear into the page's html.
Once it's there we do need to fill this input with our login information and here's where i found a second major issue: page.$$ or page.$x command. The good thing is that the dependency documentation is updated!
I don't know what happens here but if you check on google or any other search tool (including ChatGPT) it will say for you to use the $x command for it, however around january 2024 it deprecated and the code now is page.$$ using the waitForSelector, before was waitForXpath. Honestly I don't know what happens here but again, all the places will give you the $x as the correct answer and it's not. Just like the Analog Clock project it appears that a lot of you out there simply copy paste without checking, be careful people.
After that I gave it my login information to fill up the input. The username and password follow the same logic.
Since the login was successful it's time to get the data! I wanted to test it getting the @markets (bloomberg's market page) data.
So at the page that i want to get the data I checked what was the html code for the tweets, you can check this oppening chrome's console and typing:
$x(`//div[@data-testid="tweetText"]`)[0].childNodes[1].childNodes[0].wholeTextThis will show the tweet text, this is how i got the puppeteer code correctly.
Now it was a matter of getting all the elements from it, getting the innerText property and putting at a JSON file.
const tweetElements = await page.$$(`xpath/.//div[@data-testid='tweetText']`);
for (let i = 0; i < tweetElements.length; i++) {
  const tweetElement = tweetElements[i];

  const tweetText = await page.evaluate(e => e.innerText, tweetElement);

  tweets.add(JSON.stringify({ text: tweetText, formattedTweetDate }));
}

await page.evaluate(() => {
  window.scrollBy(0, window.innerHeight);
});
await setTimeout(3000);
await page.evaluate(() => {
  window.scrollBy(0, window.innerHeight);
});
await setTimeout(3000);

i++;
console.log(`loop number ${i}`);

}

const tweetArray = [...tweets].map(tweet => JSON.parse(tweet));
fs.writeFileSync('tweets.json', JSON.stringify(tweetArray, null, 2), 'utf-8');
You can notice that i scrolled down the page twice to get it to upload more tweets, I went checking how many were the optimal by try and error method and found out that two times is the best.
Getting 1000 tweets took me around 30 minutes and i ended up with a 223kb JSON file.
If you go to the github you'll notice that i also get the date from the tweets as well to save into the JSON file, I didn't put it here on the description because i wanted to focus on getting the data and not necessarily manipulating it.
And this is how I created a Twitter Mining using only JavaScript! I trully hope that you enjoyed the reading for I sure did enjoyed creating it.